Wednesday, August 31, 2011

How to Make a Concealed Pen Launcher That Still Writes

Some pen mods that I make will completely destroy the pen "function".  Not true of this mod!  This mod allows you to fire ink cartridges AND still be able to write.  It is so concealed that I was able to shoot people write with this during school.
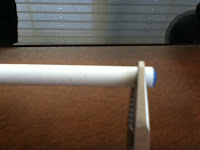
See....normal pen right?
Just kidding.

Tools of the Trade:
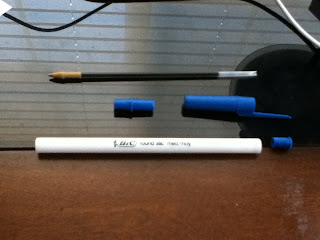
Something that cuts through plastic (Rotary drill, art knife, razor blade, or my favorite: Leatherman)
Pliers
Spring (has to fit inside pen barrel and fit around ink cartridge)

Step 1: Disassemble Pen
If you don't know how to, go to my other post How to Disassemble a Disposable Bic Pen

Step 2: Cut Front Cartridge Holder
 ~This is the step that requires a knife.  I am not responsible for any damage caused to anything (or anyone) you choose to cut with your knife, except for the pen.  If you accidentally slip and cut yourself, tough luck.  You have been warned.~

Take the knife and cut down about half of the cartridge holder.  Save the ring of plastic you just cut off.  This part will take a LOT of time.  So if you have homework to do, I suggest you do your work now and save this part for later.  


Step 3: Reassemble the Pen
Take the ring of plastic you cut off and wedge it into the back of the pen as indicated in the picture. 

 Next, take the spring and drop it down the front part of the pen.  


Take your ink cartridge and also drop it down the front part of the pen.  The back part of the ink cartridge should poke out.  Pull back and let go!


How to Make a "Ballistic" Pen

This tutorial will show you how to take a gel pen and transform it into a pen launcher, with a similar form to the Ballistic Knife found in Black Ops.  This can launch anything, from an ink cartridge to a wad of paper.

Tools of the Trade:
Scissors
An eGel Avery pen (link found here)
(A Pilot G-2 is a passable substitute, but the spring can't be as strong)
A large spring

Now for the fun part!

Step 1: Disassemble Pen
Unscrew the front part of the pen and remove the ink cartridge inside.
 Next, take the cartridge and poke out the plunger housed in the back of the pen.
You should have these two parts separated now.
Now take the spring out of the front part of the pen by hitting it on the floor. (yeah, seems strange, but it's the only way to take out the spring)
Step 2: Reassemble the pen
Now you have to put the parts back, but in a different order.  But before you do that, you should first get your large spring.
The spring should be powerful, but not so strong as to not stay in the "armed" position.
Now rearrange the parts.
Put the parts back together in this order: plunger, spring, lock.
Step 3: Modifying the tip
Before anything can be launched out of the pen, we first need to either chop off the tip of the pen (Pros: Launches larger objects. Cons: Takes a while to cut) or simply make it larger (Pros: Much faster, easier. Cons: Limited to ONLY disposable pen ink cartridges)
So I will split this step up into 2 sections.

Step 3a: Cutting off the tip
This is much harder to do, but it is worth the larger variety of ammo you can use.
First take off the grip.

This pen is complete!  To arm it, just push the ink cartridge down the barrel until you hear a click.  Press the plunger at the end to launch the cartridge.  Or you can remove the cartridge and drop something down the barrel, such as a wad of paper, a toothpick, or a different ink cartridge.

Step 3b: This is the simpler version which only requires you to grind down the sides of the pen tip.
Insert scissors and turn until you can fit a disposable pen ink cartridge inside it.

This pen is also complete!  The only difference is that you are limited to firing the ink cartridge of a disposable pen.

How to Disassemble a Disposable Bic Pen

This type of disposable Bic pen will be the standard of what these tutorials use.  This tutorial will show you the quickest and easiest way to disassemble this type of pen.  If you are at all interested in my other tutorials, you should read this one first.

Step 1: Separate the ink cartridge. (You shouldn't need a step on how to take off a pen cap.  If you do...well...good luck)
Pinch the front part of the pen (the blue part in the picture) and grab the pen firmly with your other hand.  Twist back and forth until you can pull off the blue part.


Step 2: Remove ink cartridge.
Pinch the blue part of the ink cartridge with one hand and pinch the ink cartridge itself with your other hand.  Try to push the writing tip out of the blue part by pushing in the ink cartridge.


Step 3: Removing the end cap
This part requires a bit more effort.  Take your pliers and squeeze the pen about where it is in the picture.  Don't squeeze too hard, as the pen plastic will break.  It will be easy to take out after that, but the point is to not crack it so you can have a pen that is intact.  


Complete! The pen has now been fully disassembled.