Thursday, December 1, 2011

How to Make a Pen Gun

For those of you who don't have the springs set I have strongly recommended, this is a simple pen mod that is simple and very popular.  Again, you must have basic knowledge of how to disassemble a bic pen.

Tools of the Trade
1 (or 2) Rubber band(s)
Duct tape
Disposable bic pen

Step 1: Disassemble the bic pen.
If you read other posts, this should be nothing new.
Step 2: Attach rubber band.
You can do this by either cutting the rubber band and taping the free ends to the sides of the pen to look nicer, or you can just take the rubber band and tape it to the pen.  But you must have some part of the rubber band covering the open end of the pen.
Complete! To fire, just load an ink cartridge and pull back on the rubber band. I told you that was simple. 

Saturday, October 22, 2011

How to Make an Office Trebuchet (catapult)

I know it has been over a month since I updated, but that's because I've been extremely busy making projects.  I would try something, and it would fail.  I would make something else, and it would fail.  Finally I made a project that is worth presenting to an audience.

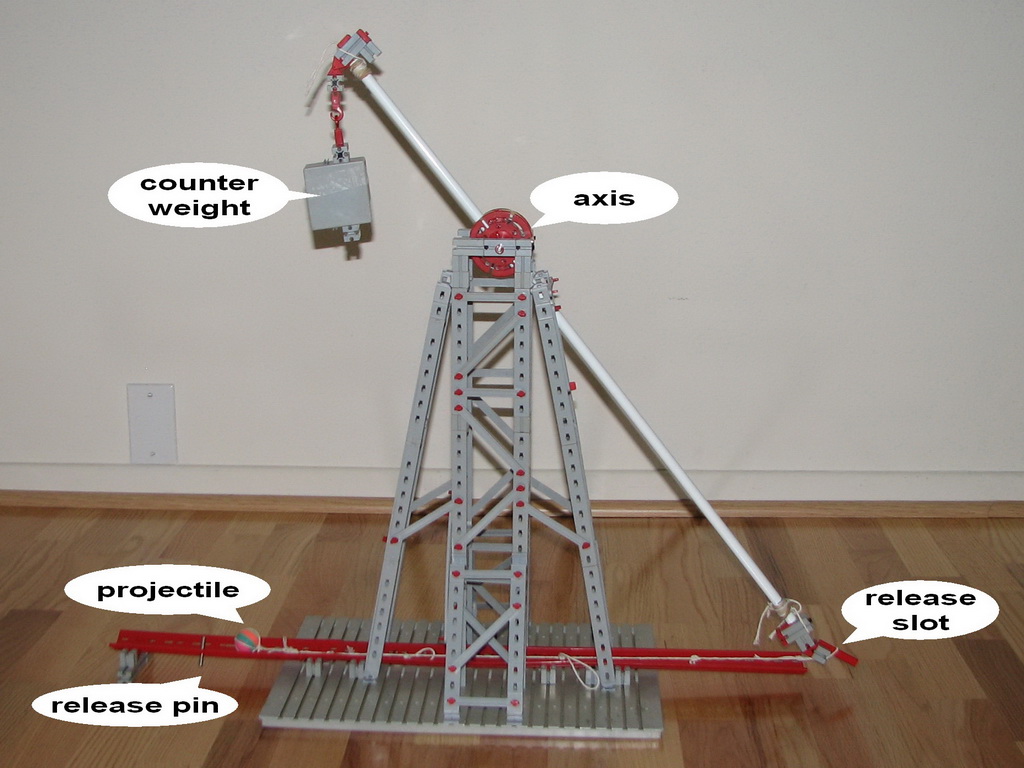
Think you need more firepower than a wimpy pen gun?  I've got a solution called the Office Trebuchet.  In case you don't know what a trebuchet is, I'll give a short explanation.  A trebuchet is a catapult that uses a heavy counter-weight on one end of the catapult to send the projectiles on other side of the catapult flying.  Here's a picture.

It looks as if that trebuchet is built of some sort of plastic that looks like Legos.  I will be building mine out of pencils and a few other materials.  Now without further ado, let's begin.

And please don't comment on the strange looking pencils.  They were the only ones I could find that were completely useless.  Remember, by using used up material, you are recycling!
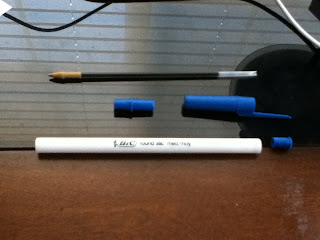
Tools of the Trade:
6 pencils of the same size
2 pencils of the same size, but smaller than the other 6
9V batteries, or a bunch of AA's
Duct tape
Fishing line, or string
Cardboard

Step 1: Forming the Cross-pieces
Take two pencils and lay one on top of the other, like so.  Use duct tape to secure them in place.
 Repeat.

Now, take the fifth pencil and put it in between the intersection of the two pencils, where the duct tape is.
Repeat with the other side of the pencil and the other two pencils. 
When done properly, the structure should look like the frame of a swing set, standing up.

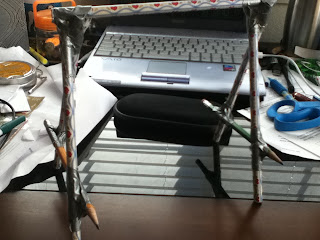
Step 2: Reinforcements
Now you will notice that the frame is slightly wobbly.  That's not good, especially if you are sieging a nearby office cubicle.  Take one of the shorter pencils and tape it onto the bottom of the frame, as shown in the picture.
Repeat with the other side.


Your catapult frame should look like this:


Next, tape the four legs onto a piece of cardboard.

Step 3: The Swinging Arm
Take a length of fishing line and create a circle.  Tie off the ends.  Take that circle and wrap it around the middle beam of the catapult.  If you need help, refer to the picture.  That's what it's there for.
 Next, slip a pencil in between the "V" formed in the picture and the pencil.
Tape the fishing line onto the pencil arm to secure it.  It should be tight enough that the arm doesn't slide around the middle beam, but loose enough that it will easily swing.
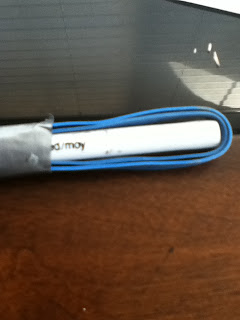
Step 4: The Counter-weight
This step requires the 3 9V batteries.  Tape them together as shown in the picture.  You should use duct tape, as they are quite heavy.


Next, tie the fishing line around the block and secure it with tape.

Finally, tie the fishing line around the shorter end of the swinging arm.  You may want to cut a notch in the pencil first to make sure it doesn't fall off.  Go the extra step and hot glue the line onto the notch.  Tape it as well.
If you want to give this more firepower, add more weight with more batteries.  But for now, this is all that is necessary. Next thing to do is add a fork or spoon onto the other end of the arm.  You are done!  Trebuchet complete!

Wednesday, September 21, 2011

How to Make a Pen Knife

The motto of this site goes "the pen is mightier than the sword".  Now for all of you people who would rather have a sword than a pen, this goes to you.  Why put the pen a rank above the sword when you can combine the two?  In this post, I will teach you how to create a fully functional pen with a knife inside.  Again, I use this as a sort of stylish art knife, but I have no idea how you guys may use it.  Well I actually do have an idea, but that's not the point.  The point is that I am NOT responsible in any way for any damage you may cause to anything, anyone, or yourself.

Tools of the Trade
A small blade (an art knife, a pencil sharpener blade, a disassembled letter opener, ect.)
Pen (preferably the standard BIC pen, or a sharpie pen)
Hot glue

For BIC pens:
Step 1: Disassemble Pen
Same thing as always, guys.  If you don't remember by now, here's a link.


Step 2: Insert blade into empty pen holder.
This part is relatively easy, just don't cut yourself while you put the blade inside.


Done!  If you used a BIC pen, just put the end piece back on then cap it. 

For Sharpie pens:
Step 1: Disassemble
There's not much to take apart, just the metal tip.  Use pliers and grab the metal.  Pull out.  If you've never seen a sharpie pen before, here's what it looks like.
Step 2: Cut a notch
Once the metal tip has been removed, cut a notch down the center of the gap to give the blade a good place to stay. 

Step 3: Insert blade
Now, just insert the blade into the notch you just cut.  Hot glue it afterwards


Done!  You have now made a Sharpie!  Pun intended.

Wednesday, September 7, 2011

How to Make a Shoelace Dart

Before you read this post, I highly recommend you realize what this post is about first.  This post will allow you to create a potentially hazardous object, or weapon, depending on how you define this.  I myself use this as a simple homemade dart, just to have fun with targets.  However I have NO idea how you may use this, so...DISCLAIMER: I am not responsible for any damage you may cause to yourself or anyone else.

Now that we have that cleared up, lets begin.
This tutorial is very simple, only requiring 2 steps.  This can also be launched out of many other mods, depending on how thick your shoelace is.  

Tools of the Trade:
Unused shoelace
Straight pin, or sewing needle
Hot glue gun, if you want

Step 1: Real-life Cut the Rope
Take the end of a shoelace and cut it off.  If you don't know where the end of a shoelace is, I'll give you a hint.  There are only 2 ends.  Now you get it?


Step 2: The Pointy End
Now, be careful with this step.  Take the end (the sharp end of course) and poke it through the frayed end of the shoelace.  Try to poke it through the aglets (plastic things) at the other end.  If you are unsuccessful, you can try to cut them off.  Just make sure you hot glue around it afterwards.  And there you have it!  Your own shoelace dart. 


There are different ways to load this into pen launchers.

With the Ballistic Pen, press back the spring first.  Now carefully unscrew the top part and try not to press the trigger, otherwise it will blow up and send parts flying everywhere.  Take the needle end of the dart and hold it from the side, so that the tip doesn't face anyone.  Drop the dart down, and screw on the cap.  You should do this so that you don't risk accidentally shooting the dart at maximum speed while your hand is above it.  At least this way, the pen explodes away from you and your hand. 

A simple way to load this is to insert this into a pen housing or straw, and use it as a blowgun.  MAKE SURE you are blowing into the right end and NEVER inhale. 

To load this into the "Pen that Launches Anything", simply load it tail end first, and that is it. 

Saturday, September 3, 2011

How to Make a Concealable Pen Gun

This tutorial is more advanced than the others, being that it uses 2 springs, fishing line, and some parts you may not have.  But don't worry, I have listed substitutes.  If you don't mind spending some money, I recommend buying this spring set if you don't have Amazon Prime or this set if you do have Amazon Prime.  They are around $8-10 but they give you 200 springs, which goes a long way for projects, no pun intended.  I have a box of springs similar to these and they have proven to be very useful.  If you don't need the extra 198 springs, you can give them to your dad.  I'm sure he'll be happy.  Anyway, back to the tutorial.

Tools of the Trade:
1 Pen
2 3/16" x 1 7/16" springs
1 old-fashioned ballpoint pen refill
1 paperclip, any size
Pliers

Alternate Tools
-If you don't have springs, take a bunch of springs from various "clicking" pens.  But make sure that they are the same size, since if you pull back, a smaller spring might get jammed in a larger spring.
-If you don't have fishing line, use durable string.  But the string should be thin and easy to thread through something.  If you don't even know what fishing line is, just look here.
-If you don't have a ballpoint pen refill, find another object similar in shape and size.  But it doesn't have to even be circular.  For example, it could be an M-shaped paperclip that would hold down both sides of the spring.  But your replacement criteria should be this:
-Can I attach it to the fishing line?
-Does it fit inside the pen?
-Can it hold down the spring when pulled?
Then again, you should try to get the ink cartridge, as it is the easiest to thread.  


Step 1: Disassemble Pen


Step 2: Threading the Refill
This step requires the black part of the pen refill.  Take off the black part of the refill.


Next, take a length of fishing line and create a bend in it.


Take the creased part and put it through the non-threaded end of the refill


Step 3: Add Paperclip
Using pliers, bend and cut the paperclip into a small V- shape.


Take the paperclip and hook it to the loop that comes out of the refill.


Pull back on the fishing line so that the paperclip is firmly wedged into the refill.


Step 4: Add Springs

Take the other end of the fishing line and put two springs through the line.


Next add the end of the pen and tie a knot in the fishing line.  Hot glue the knot if necessary.


Put this section into the front of the pen, where the cap should go.


Complete! Take anything, such as a wad of paper and put it into the open end.  Pull back on the string, and let go.  If you want to cover the open end up, take the cover off of another pen.