Friday, July 6, 2012

Homemade iPhone Battery Pack part 1

How many of you have iPhones? How about iPods? I would bet that 90 percent of my viewers have some mobile Apple device. And I would also bet that 100 percent of the people who have iPhones or iPods hate the "20% Battery" warning. This tutorial will show you how to create a Battery pack for your Apple device that is powered by normal Alkaline batteries.


DISCLAIMER: This tutorial is meant for and geared toward people who are used so using soldering irons. If you are new to using soldering irons or have no idea what a soldering iron is, please ask someone else who knows how to use a soldering iron and have them teach you. Either way, whether or not you know how to use one or not, use the proper safety gear. I am not responsible for any injuries that you may receive or deal out, nor am I responsible for any type of damages caused to your Apple devices.

Tools
Soldering Iron

List of Parts for Circuit
PCB board
USB female socket
2 75k ohm resistors
2 50k ohm resistors
1 7805 5V regulator
2 100nF capacitors

This will be a general overview of building the circuit for the battery pack and the detailed instructions for the case will be given in part 2 of this post.
NOTE: When soldering the USB socket, face the open part to the right with the connector pins facing left, as in the schematic. Inside the socket, you will see that there are "2 halves", a hollow half and a half with pins. Make sure that the hollow half is on the bottom and the pins are on the top.
Circuit Schematic
This circuit is necessary for the charger to be accepted by the Apple device. Basically, the USB socket must have exactly 5V on the first pin, 2V on the second and third pins, and ground on the fourth pin. I cannot give step-by-step instructions for soldering in each and every resistor, wire, capacitor, regulator, ect. because depending on the type of PCB board you buy, the pre-made copper insertions on the back of the board are different. Any type of battery above 6 volts will work for this circuit. To use this circuit, just plug in your USB charger cord and plug it into your Apple device.

Wednesday, May 16, 2012

The Top Ten Jailbroken Apps

There will always be people who are new to jailbreaking that first say "How do I do this" then after jailbreaking ask "What can I get from this". Even if you are one of those experts who have jailbroken all of your Apple products, or have jailbroken all of your friend's Apple products, there will always be an overlooked gem in the vast sea of jailbroken apps. These are my favorite top ten apps for iOS 5 from the one and only Cydia.

Winterboard~
Winterboard is probably one of the most versatile theming apps that is on Cydia. It allows the user to change system sound effects, the app icon themes, and even things such as the WiFi logo on the status bar. You can even make your own themes, which may be difficult for some who have had very little experience with image editors. Exclusive for iOS 5, the Notification Center background and grabber may also be changed. I myself have set my NC background as an Alienware logo I found from the internet. If you want to create a theme, that will be addressed in my other blog post, soon to come.


SBSettings~
We all have probably at one point or another watched one of our friends use their jailbroken iPods or iPhones to do special things. I remember watching my friend's iPod Touch suddenly drop down a menu from the top of his screen I had never seen before. This app is the famed SBSettings, or StatusBarSettings. By simply sliding your finger across the status bar, a menu with WiFi, Bluetooth, 3G, and many other toggles will magically descend from the top of the screen. This is particularly useful when you don't want to have to scroll through the entire settings app to toggle something. Another great feature is the
ability to customize what is on the status bar. For some odd reason, Apple has decided to not allow the battery percentage to be shown on the iPod Touch. SBSettings fixes this. It also allows you to change your carrier name, which is the text in the top left corner on the status bar that says "iPod" or "Verizon" or whatever. You can change the text to your name, your pet's name, or your friend's pet's name if you really want.

NCSettings~
This sounds a lot like SBSettings doesn't it? Well, they both actually function on the same principle; a menu with toggles you can access anytime in any app. However with the introduction of the Notification Center in iOS 5, you can now put your toggles straight into the NC, hence the name NCSettings. I actually prefer to deactivate my SBSettings window and only use NCSettings, since I don't want to have two menus drop down when I want to access the NC or my toggles. So can NCSettings completely replace SBSettings? My answer is no. SBSettings comes with other functions for customization that NC does not offer, such as battery percentage and carrier customization. My advice is to install both but deactivate the drop down menu for SBS.

WidgetTask~
Another modification for the NC, WidgetTask puts your multitasking bar in the NC. It is quite convenient when you want everything to be in the same place. Replacing the double-click home button, by pulling down the Notification Center, you can close or open apps, see what's running, and even have the music player controls. Also useful in class if you don't want the teacher to hear *click-click* breaking the awkward silence of the Q&A part of lecture.

Zephyr~
Unfortunately with the new iOS 5, jailbroken multitasking gestures on the iPod and iPhone no longer work. If you were using your multitasking from your jailbreak in iOS4, but decided to update to iOS 5, when you jailbreak, the multitasking gestures option shows up but is unfortunately broken. Zephyr amends this and gives back our gestures, just like we used to have.

Barrel~
If your Apple device's screen was cut out then pasted onto the inside of a barrel, your page turning interface may or may not look quite different, depending on how many times you dropped your iPhone. Barrel lets you customize how you turn the pages of your homescreen, or SpringBoard, as it is more commonly known. You can make your scrolling look as if all of the pages are sides of a cube that rotates, or you can have the apps form into a circle when rotated. The pages can even be scrolled vertically. There are many choices for what you can do with barrel. Plus, it looks cool when you are comparing phones with your friends and your apps rearrange themselves into a Pac-Man head when you scroll.

ColorKeyboard~
Yet another theming app, CK allows you to change the appearance of your keyboard. You can stick with some simple changes, such as changing the key color, or you can completely revamp the keyboard and turn it into a steampunk typewriter. There are also a lot of different customization features, and there are already tons of preset themes that are available for download. On my iPod, I have installed a MacBook Pro keyboard theme, making the keyboard look like a mini MacBook.

iFile~
If you do a lot of downloading and installing on the go without a computer, iFile makes your job a whole lot easier. iFile is essentially explorer.exe for your Apple device. If you don't know what I mean, explorer.exe is that extremely slow and unstable program in Windows that lets you see folders and their contents. With iFile, you can store documents such as PDF's, .doc's, and even some movie files. I even use it to create small themes on the go. If you happen to have Minecraft Pocket Edition or Minebuilder, it is possible to install your own texture pack. Amazing isn't it? If you don't have Minecraft or you just don't care, iFile is still quite useful for storing documents.

Dreamboard~
Dreamboard is just simply amazing. It has allowed me to change my homescreen entirely. Now, I can turn my iPod into an Android look-alike. The weather and clock widget is in the background, there is that curved dialer at the bottom, and the far left page has a web viewing widget I can customize. If you don't like Android, you can run a SnowLeopard look-alike, complete with the drop-down menus at the top. You can even turn your iPhone into a Galaxy S2. There are even other custom themes made by other users that for example allow you to have full control of your device with only one hand. DreamBoard gives you an exciting alternative to the native SpringBoard.

Adblocker~
A very simple app whose name says it all. This app blocks annoying ads that show up in almost every free app you download, whether from Cydia or the App Store. You've probably seen the "Upgrade for $0.99 to get the premium ad-free version!" With Adblocker, you can actually save money and not have to buy the premium versions of apps. Just go to the Adblocker menu and toggle the apps that have ads. Go back to that app and voila! No more ads. Even in Safari, annoying pop-ups that change your tabs bother me so much! Instead, toggle Safari in the Adblocker menu and all of the pop-ups in Safari will cease to appear. This app is a particular favorite, just because of the fact that you can see it working to save you money. And by the way, there is no "Premium upgrade" for this app.

In no particular order, those were my top ten apps available only when you jailbreak. Hang in there for my next post which will be on how to make your own themes for WinterBoard.

Thursday, December 1, 2011

How to Make a Pen Gun

For those of you who don't have the springs set I have strongly recommended, this is a simple pen mod that is simple and very popular.  Again, you must have basic knowledge of how to disassemble a bic pen.

Tools of the Trade
1 (or 2) Rubber band(s)
Duct tape
Disposable bic pen

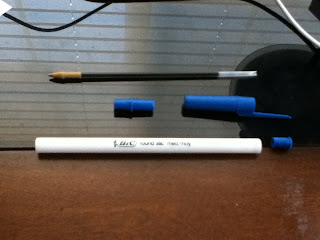
Step 1: Disassemble the bic pen.
If you read other posts, this should be nothing new.
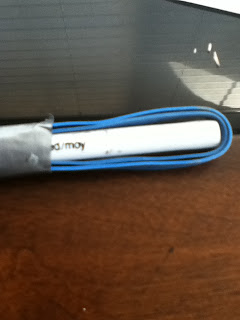
Step 2: Attach rubber band.
You can do this by either cutting the rubber band and taping the free ends to the sides of the pen to look nicer, or you can just take the rubber band and tape it to the pen.  But you must have some part of the rubber band covering the open end of the pen.
Complete! To fire, just load an ink cartridge and pull back on the rubber band. I told you that was simple. 

Saturday, October 22, 2011

How to Make an Office Trebuchet (catapult)

I know it has been over a month since I updated, but that's because I've been extremely busy making projects.  I would try something, and it would fail.  I would make something else, and it would fail.  Finally I made a project that is worth presenting to an audience.

Think you need more firepower than a wimpy pen gun?  I've got a solution called the Office Trebuchet.  In case you don't know what a trebuchet is, I'll give a short explanation.  A trebuchet is a catapult that uses a heavy counter-weight on one end of the catapult to send the projectiles on other side of the catapult flying.  Here's a picture.

It looks as if that trebuchet is built of some sort of plastic that looks like Legos.  I will be building mine out of pencils and a few other materials.  Now without further ado, let's begin.

And please don't comment on the strange looking pencils.  They were the only ones I could find that were completely useless.  Remember, by using used up material, you are recycling!

Tools of the Trade:
6 pencils of the same size
2 pencils of the same size, but smaller than the other 6
9V batteries, or a bunch of AA's
Duct tape
Fishing line, or string
Cardboard

Step 1: Forming the Cross-pieces
Take two pencils and lay one on top of the other, like so.  Use duct tape to secure them in place.
 Repeat.

Now, take the fifth pencil and put it in between the intersection of the two pencils, where the duct tape is.
Repeat with the other side of the pencil and the other two pencils. 
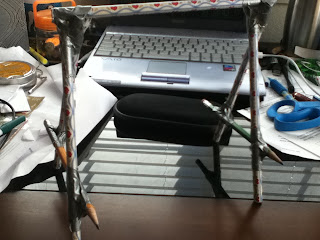
When done properly, the structure should look like the frame of a swing set, standing up.

Step 2: Reinforcements
Now you will notice that the frame is slightly wobbly.  That's not good, especially if you are sieging a nearby office cubicle.  Take one of the shorter pencils and tape it onto the bottom of the frame, as shown in the picture.
Repeat with the other side.


Your catapult frame should look like this:


Next, tape the four legs onto a piece of cardboard.

Step 3: The Swinging Arm
Take a length of fishing line and create a circle.  Tie off the ends.  Take that circle and wrap it around the middle beam of the catapult.  If you need help, refer to the picture.  That's what it's there for.
 Next, slip a pencil in between the "V" formed in the picture and the pencil.
Tape the fishing line onto the pencil arm to secure it.  It should be tight enough that the arm doesn't slide around the middle beam, but loose enough that it will easily swing.
Step 4: The Counter-weight
This step requires the 3 9V batteries.  Tape them together as shown in the picture.  You should use duct tape, as they are quite heavy.


Next, tie the fishing line around the block and secure it with tape.

Finally, tie the fishing line around the shorter end of the swinging arm.  You may want to cut a notch in the pencil first to make sure it doesn't fall off.  Go the extra step and hot glue the line onto the notch.  Tape it as well.
If you want to give this more firepower, add more weight with more batteries.  But for now, this is all that is necessary. Next thing to do is add a fork or spoon onto the other end of the arm.  You are done!  Trebuchet complete!

Wednesday, September 21, 2011

How to Make a Pen Knife

The motto of this site goes "the pen is mightier than the sword".  Now for all of you people who would rather have a sword than a pen, this goes to you.  Why put the pen a rank above the sword when you can combine the two?  In this post, I will teach you how to create a fully functional pen with a knife inside.  Again, I use this as a sort of stylish art knife, but I have no idea how you guys may use it.  Well I actually do have an idea, but that's not the point.  The point is that I am NOT responsible in any way for any damage you may cause to anything, anyone, or yourself.

Tools of the Trade
A small blade (an art knife, a pencil sharpener blade, a disassembled letter opener, ect.)
Pen (preferably the standard BIC pen, or a sharpie pen)
Hot glue

For BIC pens:
Step 1: Disassemble Pen
Same thing as always, guys.  If you don't remember by now, here's a link.


Step 2: Insert blade into empty pen holder.
This part is relatively easy, just don't cut yourself while you put the blade inside.


Done!  If you used a BIC pen, just put the end piece back on then cap it. 

For Sharpie pens:
Step 1: Disassemble
There's not much to take apart, just the metal tip.  Use pliers and grab the metal.  Pull out.  If you've never seen a sharpie pen before, here's what it looks like.
Step 2: Cut a notch
Once the metal tip has been removed, cut a notch down the center of the gap to give the blade a good place to stay. 

Step 3: Insert blade
Now, just insert the blade into the notch you just cut.  Hot glue it afterwards


Done!  You have now made a Sharpie!  Pun intended.

Wednesday, September 7, 2011

How to Make a Shoelace Dart

Before you read this post, I highly recommend you realize what this post is about first.  This post will allow you to create a potentially hazardous object, or weapon, depending on how you define this.  I myself use this as a simple homemade dart, just to have fun with targets.  However I have NO idea how you may use this, so...DISCLAIMER: I am not responsible for any damage you may cause to yourself or anyone else.

Now that we have that cleared up, lets begin.
This tutorial is very simple, only requiring 2 steps.  This can also be launched out of many other mods, depending on how thick your shoelace is.  

Tools of the Trade:
Unused shoelace
Straight pin, or sewing needle
Hot glue gun, if you want

Step 1: Real-life Cut the Rope
Take the end of a shoelace and cut it off.  If you don't know where the end of a shoelace is, I'll give you a hint.  There are only 2 ends.  Now you get it?


Step 2: The Pointy End
Now, be careful with this step.  Take the end (the sharp end of course) and poke it through the frayed end of the shoelace.  Try to poke it through the aglets (plastic things) at the other end.  If you are unsuccessful, you can try to cut them off.  Just make sure you hot glue around it afterwards.  And there you have it!  Your own shoelace dart. 


There are different ways to load this into pen launchers.

With the Ballistic Pen, press back the spring first.  Now carefully unscrew the top part and try not to press the trigger, otherwise it will blow up and send parts flying everywhere.  Take the needle end of the dart and hold it from the side, so that the tip doesn't face anyone.  Drop the dart down, and screw on the cap.  You should do this so that you don't risk accidentally shooting the dart at maximum speed while your hand is above it.  At least this way, the pen explodes away from you and your hand. 

A simple way to load this is to insert this into a pen housing or straw, and use it as a blowgun.  MAKE SURE you are blowing into the right end and NEVER inhale. 

To load this into the "Pen that Launches Anything", simply load it tail end first, and that is it. 

Saturday, September 3, 2011

How to Make a Concealable Pen Gun

This tutorial is more advanced than the others, being that it uses 2 springs, fishing line, and some parts you may not have.  But don't worry, I have listed substitutes.  If you don't mind spending some money, I recommend buying this spring set if you don't have Amazon Prime or this set if you do have Amazon Prime.  They are around $8-10 but they give you 200 springs, which goes a long way for projects, no pun intended.  I have a box of springs similar to these and they have proven to be very useful.  If you don't need the extra 198 springs, you can give them to your dad.  I'm sure he'll be happy.  Anyway, back to the tutorial.

Tools of the Trade:
1 Pen
2 3/16" x 1 7/16" springs
1 old-fashioned ballpoint pen refill
1 paperclip, any size
Pliers

Alternate Tools
-If you don't have springs, take a bunch of springs from various "clicking" pens.  But make sure that they are the same size, since if you pull back, a smaller spring might get jammed in a larger spring.
-If you don't have fishing line, use durable string.  But the string should be thin and easy to thread through something.  If you don't even know what fishing line is, just look here.
-If you don't have a ballpoint pen refill, find another object similar in shape and size.  But it doesn't have to even be circular.  For example, it could be an M-shaped paperclip that would hold down both sides of the spring.  But your replacement criteria should be this:
-Can I attach it to the fishing line?
-Does it fit inside the pen?
-Can it hold down the spring when pulled?
Then again, you should try to get the ink cartridge, as it is the easiest to thread.  


Step 1: Disassemble Pen


Step 2: Threading the Refill
This step requires the black part of the pen refill.  Take off the black part of the refill.


Next, take a length of fishing line and create a bend in it.


Take the creased part and put it through the non-threaded end of the refill


Step 3: Add Paperclip
Using pliers, bend and cut the paperclip into a small V- shape.


Take the paperclip and hook it to the loop that comes out of the refill.


Pull back on the fishing line so that the paperclip is firmly wedged into the refill.


Step 4: Add Springs

Take the other end of the fishing line and put two springs through the line.


Next add the end of the pen and tie a knot in the fishing line.  Hot glue the knot if necessary.


Put this section into the front of the pen, where the cap should go.


Complete! Take anything, such as a wad of paper and put it into the open end.  Pull back on the string, and let go.  If you want to cover the open end up, take the cover off of another pen.